
Getting the Handle on your SVO
By: David Sandiford – SVOCA
#0038
Taking what is arguably the finest
handling Mustang ever produced to the level of a surgical cornering weapon can be an
exercise in refinement.
The factory supplied the basics with
adjustable shocks, stout brakes, good basic front geometry, and a favorable weight
distribution. The aftermarket adds the pieces to make all those components more focused
for the enthusiast driver.
The Mustang (Fox) chassis is of
unibody construction, with sub-frames hung off both ends supporting the
engine/suspension/drivetrain components. The front suspension is a MacPherson strut, with
an anti-roll bar. The rear suspension has upper and lower control arms locating a live
axle, also with an anti-roll bar.
These basics are noted because unless
you want to spend a bucketful of money, the locations of all these components are fixed.
The primary objective in achieving handling "feel" is to keep all these
locations and their relationships exactly as FoMoCo designed them, while the primary
objective in maximizing cornering force is to keep the tires in contact with the ground.
So, where to start?
First order of business is to replace
all the bushings with the polyurethane variety. These bushings are much less compressible
than the stock (rubber) units. Your front and rear control arms will now rotate, rather
than wallow, around the center of their pivot points. And when you compress your front
anti-sway bar when bending into a corner, the entire twisting force will be applied to the
opposite side a-arm, rather than partially into the frame. See, reduction in variation of
location. On an SVO with old, worn out bushings the transformation is awesome. Make sure
you have a gas torch to help get the old bushings out, and a big bench vise sure helps in
putting the new ones in. I personally don’t run the poly bushings in the upper rear
control arms (possible binding problems), but I’ve heard good and bad both ways.
Next up, chassis stiffening. With all
the suspension loads going into the outboard sub-frames, chassis twist is a real problem
on the Fox chassis. This is particularly noticeable on turn-in. You turn the wheel, the
outside wheel plants (thanks to the new bushings), the spring compresses, the K-member
flexes, the front sub and body flex, then the rear end does it’s rollup and flex
routine…. and eventually you sort of pogo around the corner. You may even hear the
tires do short chirps as they load and unload. Your cornering force is definitely not
being maximized.
The front-end fix is pretty easy.
Install a 4pt G-Load brace. These install between the K-member and the unibody. Usually no
new holes required, and installation time of under an hour. Don’t be surprised if
that straight G-Load brace seems to take on a weird twist when you begin to tighten it
down. It’s not the brace, it’s the K-member/unibody relation. A 4 or 6pt strut
tower brace would be a real nice addition too, but I haven’t found one that clears
all the SVO specific parts. A Monte-Carlo type cross-brace would probably be better than
none at all.
The rest of the chassis stiffening is
achieved by the installation of sub-frame connectors. Buy the weld-on type, you don’t
really want to drill holes in your chassis, if you can avoid it. Make sure that the
sub-frame connectors have the seat crossbars in them too. Once you have welded these in
place, your SVO is now (essentially) a full-frame car. Loads into the sub-frames are now
resisted by the entire chassis, rather than absorbed by bending into the unibody. If you
want to install additional bracing like extreme subs, jacking or convertible rails, or the
ultimate, a street cage; Go for it. Stiffer is better.
By now you’re well on your way to
that slot-car feel. Your SVO should feel very crisp on turn-in, and very solid in normal
driving. Total cash outlay for parts? Should be less than $500.
Front End Basics
Camber
With all the chassis mounts solidly
held in place, it’s time to optimize the front-end geometry. This requires the
installation of caster/camber plates. The stock units have limited camber adjustment, no
caster adjustment, and use rubber onion heads for the upper shock mount. Aftermarket units
have far more adjustment range, and typically use spherical bearings to solidly locate the
shock.
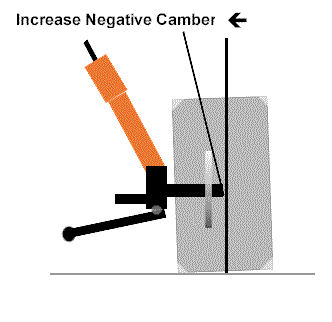
Camber is measured, looking from the
front to the rear of the car, through the center of the wheels in degrees from vertical.
Negative (desirable) camber is when the inside top edges of the tires are closer together
than the bottom inside edges. (Think of camber as vertical toe-in) What negative camber
does is a combination of pre-loading the sidewalls of the tires (to better resist
cornering forces) and also present a flatter profile as the tire deflects during
cornering. (Same old idea about keeping as much of the tire as possible in contact with
ground, maximizing cornering force). There are some other issues with Ackerman angles,
bump-steer, and roll-centers that also affect this, but we’re trying to work with
original components as much as possible.
A quick digression … My favorite explanation of push and loose conditions. "A car
that’s pushing (understeering) will wreck into the fence front end first. A car
that’s loose (oversteering) will wreck into the fence back end first." – Benny
Parsons.
Bottom line – More negative
camber = better turn-in. Unfortunately, more negative camber also = more tire wear. A car
with aggressive negative camber settings will very quickly wear out the inside edges of
the tires. It may also be too squirrelly if you mainly drive at high speeds. The opposite
is true with minimal negative camber settings. A car setup this way will push the front
end (understeer). The outside edges of the tires may become prematurely worn.
So what’s the setting range? Here
are some suggestions, gratefully plagiarized from a wide variety of owners.
Stock – ¾ deg negative.
Performance and high speed driving
– 1~1 ½ deg negative
Weekend AutoX – 1 ½ ~ 2 ½ deg
negative
Hardcore AutoX – Push the struts
in until you run out of adjustment.
If you occasionally AutoX your SVO
daily driver, you might want to look into the camber/caster plates that adjust camber and
caster separately, with lock bolts for each function. This way you can drive to the track,
readjust for racing, then put them back to the street setting when you’re going home.
While we’re on front-end
adjustments, a few words about setting tire toe-in. For street applications, suggested toe
in is –0-; that’s right, flat. While this makes the car more susceptible to
cross winds, it is also far more willing to change directions, and well worth the
trade-off.
If you AutoX, the hot setup is to set
the front-end with some toe-out. Definitely not suggested for the daily driver.
Caster
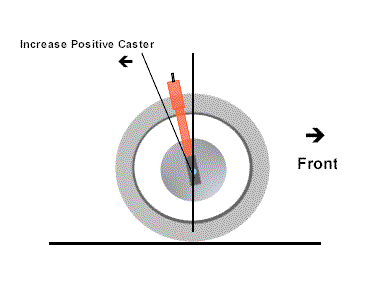
Caster is measured from the side of
the car, through the center of the steering axis, in degrees from vertical. Positive
caster (desirable) is towards the rear of the car. By angling the top of the steering
pivot point towards the rear, the steering is less upset by road deflections fed into one
front tire or the other. High-speed stability is improved.
Performance settings are generally
anything over 1 deg positive. The road-racers I’ve talked to really like 2~3 deg
Positive caster.
Spring Selection
Always a hot-button issue, there are
probably as many opinions on spring selection as there are springs to select from. Can you
improve the handling of your SVO by changing springs? Absolutely. You can also mess up
your ride by installing the wrong springs.
A few basic suggestions.. If you plan
on street driving your SVO, use progressive rate springs. While single-rate springs are
great on a billiard table smooth racetrack, Main Street usually has potholes, expansion
strips, speed bumps, and railroad crossings. The softer initial spring will absorb these
impacts enough to save those fillings you’re almost finished paying for, and the
higher secondary rate will keep the suspension from bottoming out when you’re feeling
frisky.
Second suggestion, don’t buy 5.0
racing rate springs. We don’t have that big lump of V-8 iron sticking past the wheel
centers, and stiff rear springs will cause that light rear-end to dance sideways over the
slightest bump, particularly under braking.
500lb rate fronts and 300lb rate rears
are more than enough for street performance. If your manufacturer does not have SVO
specific rates, select the V-6 rate or the lightest 5.0 "sport" spring they
have. One last thing, do re-install your spring pads, or the squeaking will drive you
nuts.
The next big question is always
"How much drop?". The Fox chassis really likes to be lowered about 1".
Going beyond this point is more a decision about looks, and how carefully you like to
drive up and down driveways. Or how many front air dams you have stored in your rafters.
The Bump-Steer Question
Your steering rack is connected,
through the tie-rods, to the steering knuckles on your strut. As the front suspension is
compressed and rebounds, the steering knuckles follow the arc whose endpoints are the
lower a-arm pivot centerline and the upper shock-strut mount.
Since the steering rack centerline is
fixed in place, as the steering knuckle centerpoints travels away from the rack
centerline, the effective length from the steering rack to the steering knuckles changes.
To put it simply, the toe-in changes. Sometimes you get more; sometimes you get less. Toss
in turning radius, body roll, bumps in the middle of a corner, and you have a pretty
complicated set of events taking place.
Bump-steer events run the gamut from
barely noticeable, to white-knuckle near-death experiences. SVO’s that have been
lowered are very prone to the effects of bump-steer.
Now, the really bad news… The
only way you can really find out how bump-steer is affecting your setup is to pull the
wheels and the springs. Then actually measure the changes in the width between the
steering knuckles as the suspension moves through its travel. I don’t know many
people that have actually done this. Or, you can find someone who has done this, and is
nice enough to share the information. Which is what I did.
Conventional wisdom says that if you
are suffering from bump-steer, you should install a set of offset steering rack mounting
bushings.
I have a different suggestion to try
first. Try installing a set of 90 and up Mustang tie-rod ends. They have more offset than
the stock SVO rod ends, and in many cases reduce bump-steer to acceptable levels. Another alternative to offsets are solid rack
bushings. These replace the (stock) rubber
bushings and takes a little more play out of the steering rack.
The finishing touch on a steering rack
would be the addition of a solid steering coupler in place of the factory rag joint. Look for a unit with automotive components, not
something made from a socket universal.
Rear Axle
The last upgrade area is the rear axle
assembly. The primary axle locating functions are handled by the lower control arms. The
upper control arms maintain pinion angle, resist axle wind-up, and serve to keep the ring
and pinion centered down the centerline of the chassis. Axle hop is controlled by the quad
shocks or slapper bars (in the case of the early 1984 models).
Ever looked at the rear suspension
when the car is up on a rack? Ever thought to yourself "Gee, these components are a
little crude?" Well, you were right, they are.
Replacing the original bushings with
the poly’s goes a long way in tightening things up. The weak link (so to speak)
becomes those stamped steel lower control arms. If you’re looking for that little bit
extra, replace the stock lower control arms with tubular aftermarket units.
Available from a wide assortment of
manufacturers, look for a set with spherical bearings at the axle end. Tubular lower
control arms take a lot more loading before they start to deform. They’ll hook-up
better on launch too. Some tubular control arms are now available with an adjustable
spring perch, if you want to be able to change the rear ride height of your car. Be sure
to check out the condition of your torque boxes when installing upgraded control arms. If
they’re tweaked, (normally only a 5.0 problem) get one of the aftermarket
repair/upgrade kits, and have it professionally installed.
Tubular upper control arms are a
matter of personal preference. I can’t feel the difference between them and the stock
units. If you have a pinion alignment problem, there are some adjustable length units now
available.
If you’ve followed us up till
now, your SVO now has much quicker response, in transition and turn-in. Your wallet is
also about $1000 lighter. Drive the modified car back-to-back with a stocker for a real
eye-opening experience.
Adjustable Settings
There are a number of adjustable
suspension components capable of dialing in your ride for your driving style.
A few words about changing
settings from an old racer: Never change more than one thing at a time. If you do,
it’s almost impossible to determine what helped, or hurt your setup. I would strongly
suggest that you keep a notebook with a running history of settings, observations, and
results. It’s always easier to go back to a setup that worked, when you know what
that was.
The SVO was delivered from the factory
with front and rear adjustable Koni shocks. These units are single adjustable, meaning
that changing the setting changes both the compression and rebound stiffness. As near as
anybody can tell, all SVO’s were delivered with both front and rear shocks set to
full-soft. Adjustability runs from 0-"full soft" to +4 turns-"apparently
welded".
The job of the shock absorber is to
control the cycling of the spring. Take away your shocks, and you have a 4-wheel pogo
stick. Take away your springs, and you have a go-kart. So the trick in setting up the
shocks is to get enough dampening action to control excess spring movement, while still
allowing the springs to suspend the car. The shock rebound settings also help control body
lean, particularly during transitional and turn-in maneuvers.
The rear shocks need to be (fully)
compressed prior to adjustment. While they can be adjusted while still on the car, I
prefer to completely remove the shocks, unless you’re doing a track thrash. Hold the
bottom of the shock, turn the upper shock body counter-clockwise until it hits the stop.
Then start counting the clockwise turns. Typical performance driving settings for the rear
shocks would be +1~+2 turns. At the full soft setting, there is a lot of inside body
hiking on turns, and some rear wallowing on high speed banked turns. At +3 turns, the rear
axle tends to jump sideways over bumps and off-camber turns.
The front shocks are adjusted by
turning the half-moon shaped top shock end. While there is a Koni adjuster for this
(originally supplied with the car), an adjustable wrench works for those of us whose Koni
unit has grown legs.
Similar to the rears, first back off
the adjustment (counter-clockwise); then count the clockwise turns.
Performance front settings should be
+2~+3 turns. Too stiff in the front, and the car will really take off on rippled roads.
Too soft, and you will notice a lot of body roll on turn in. I have noticed that, after
adding the g-load brace, I could back off the front stiffness about ½ turn.
Tires and Wheels
The 16"x8" –225/50 OEM
wheel/tire combination is actually an excellent compromise for the SVO, given the
clearance problems of the SVO suspension underneath the Fox Mustang body.
Don’t waste your time trying to
fit a 9" rim to your SVO, unless you have a set of fender flares sitting under the
workbench, or you like the looks of the Monster Trucks. The 94~98 Mustang offset seems to
work well in the 8" width. Another
offset that works are wheels made for the late-model Probe GT. Just make sure to try before you buy. Some fit,
some don’t. If you are making contact with the wheel wells, roll the lips, or have
someone do it for you.
A word on bigger diameter rims. The
only thing that you are going to change by going to a 17"x8" 245/45 wheel/tire
combo is the appearance of your car and the weight of your wallet. Performance wise, the
difference is minimal; and certainly not worth the $1500+ expense from a bang-for-the-buck
standpoint. If you like/want the look of the modern style rims, go for it. Just don’t
kid yourself into thinking that you’re bolting on a slot car performance upgrade.
The 245 width is right on the edge of
too much tire for an 8" rim. Under hard cornering loads, you can feel the sidewalls
steering the car. Increasing tire pressure
minimizes this phenomenon. A size of 225 or
235 would actually work better, from a performance standpoint.
Handling Reference
To Increase Understeer |
To Reduce Understeer |
|
|
Bigger Front Anti-Roll Bar |
Smaller Front Anti-Roll Bar |
Less Negative Camber |
More Negative Camber |
Raise Front ride height |
Lower Front ride height |
Stiffer Spring |
Softer Spring |
Increase Front Tire Pressure |
Decrease Front tire Pressure |
To Increase Oversteer |
To Reduce Oversteer |
|
|
Bigger Rear Anti-Roll Bar |
Smaller Rear Anti-Roll Bar |
Raise Rear ride height |
Lower Rear ride height |
Stiffer Rear Spring |
Softer Spring |
Increase Rear Tire Pressure |
Decrease Rear tire Pressure |
© Copyright 1998 - 2026
Any redistribution or reproduction of part or all of the contents in any form is prohibited.